
Rust and macOS compilation / linking issue
Back in mid-2021 I installed Rust on my personal old (2014) MacBook Pro (Big Sur) using Rustup, which apparently went fine. When trying to actually build or compile any rust however, I immediately got stuck. I hadn't had any issues installing or using Rust on any other Macbooks.
Compiling a minimal 'Hello World' by rustc main.rs resulted in the following (initially) unapproachable error:
➜  ~ rustc main.rs
error: linking with `cc` failed: exit status: 1
  |
  = note: "cc" "-m64" "-arch" "x86_64" "main.main.cbc7ddee-cgu.0.rcgu.o" "main.main.cbc7ddee-cgu.1.rcgu.o" "main.main.cbc7ddee-cgu.2.rcgu.o" "main.main.cbc7ddee-cgu.3.rcgu.o" "main.main.cbc7ddee-cgu.4.rcgu.o" "main.main.cbc7ddee-cgu.5.rcgu.o" "main.main.cbc7ddee-cgu.6.rcgu.o" "main.main.cbc7ddee-cgu.7.rcgu.o" "main.4kqwyhdgeomtzpxx.rcgu.o" "-L" "/Users/username/.rustup/toolchains/stable-x86_64-apple-darwin/lib/rustlib/x86_64-apple-darwin/lib" "/Users/username/.rustup/toolchains/stable-x86_64-apple-darwin/lib/rustlib/x86_64-apple-darwin/lib/libstd-91f0e69a7ebd6e00.rlib" "/Users/username/.rustup/toolchains/stable-x86_64-apple-darwin/lib/rustlib/x86_64-apple-darwin/lib/libpanic_unwind-36050f194975374d.rlib" "/Users/username/.rustup/toolchains/stable-x86_64-apple-darwin/lib/rustlib/x86_64-apple-darwin/lib/libobject-e31c8111c698d163.rlib" "/Users/username/.rustup/toolchains/stable-x86_64-apple-darwin/lib/rustlib/x86_64-apple-darwin/lib/libmemchr-cadc9c82d273f933.rlib" "/Users/username/.rustup/toolchains/stable-x86_64-apple-darwin/lib/rustlib/x86_64-apple-darwin/lib/libaddr2line-e4462cb73bc7c44d.rlib" "/Users/username/.rustup/toolchains/stable-x86_64-apple-darwin/lib/rustlib/x86_64-apple-darwin/lib/libgimli-37047837b923d0f0.rlib" "/Users/username/.rustup/toolchains/stable-x86_64-apple-darwin/lib/rustlib/x86_64-apple-darwin/lib/libstd_detect-16528d37a8f3eab3.rlib" "/Users/username/.rustup/toolchains/stable-x86_64-apple-darwin/lib/rustlib/x86_64-apple-darwin/lib/librustc_demangle-54ab9662306ce2de.rlib" "/Users/username/.rustup/toolchains/stable-x86_64-apple-darwin/lib/rustlib/x86_64-apple-darwin/lib/libhashbrown-b493ccc9a0b06169.rlib" "/Users/username/.rustup/toolchains/stable-x86_64-apple-darwin/lib/rustlib/x86_64-apple-darwin/lib/librustc_std_workspace_alloc-7a86533803c69aa4.rlib" "/Users/username/.rustup/toolchains/stable-x86_64-apple-darwin/lib/rustlib/x86_64-apple-darwin/lib/libunwind-95847f4481c1d402.rlib" "/Users/username/.rustup/toolchains/stable-x86_64-apple-darwin/lib/rustlib/x86_64-apple-darwin/lib/libcfg_if-f9d3de4d6bdbf64b.rlib" "/Users/username/.rustup/toolchains/stable-x86_64-apple-darwin/lib/rustlib/x86_64-apple-darwin/lib/liblibc-b524a7407cf68766.rlib" "/Users/username/.rustup/toolchains/stable-x86_64-apple-darwin/lib/rustlib/x86_64-apple-darwin/lib/liballoc-38142aee14781386.rlib" "/Users/username/.rustup/toolchains/stable-x86_64-apple-darwin/lib/rustlib/x86_64-apple-darwin/lib/librustc_std_workspace_core-c27d31671763ac4a.rlib" "/Users/username/.rustup/toolchains/stable-x86_64-apple-darwin/lib/rustlib/x86_64-apple-darwin/lib/libcore-7eec28d9e637d9ae.rlib" "/Users/username/.rustup/toolchains/stable-x86_64-apple-darwin/lib/rustlib/x86_64-apple-darwin/lib/libcompiler_builtins-870fc7f82e4bde6f.rlib" "-lSystem" "-lresolv" "-lc" "-lm" "-liconv" "-L" "/Users/username/.rustup/toolchains/stable-x86_64-apple-darwin/lib/rustlib/x86_64-apple-darwin/lib" "-o" "main" "-Wl,-dead_strip" "-nodefaultlibs"
  = note: ld: library not found for -lSystem
          clang: error: linker command failed with exit code 1 (use -v to see invocation)

error: aborting due to previous error
(My terminal displayed all of this wrapped, so it didn't look anywhere near as nice and clean as presented here...!)
The internet suggested ensuring that I had XCode developer tools installed (I did) and I even installed the full 12gb XCode setup just in case, to no avail.
I spent ages faffing around trying to swap out the (often problematic and out of date) built-in Apple versions of clang / gcc / ld and the like for the ones in homebrew, but no dice there either.
After much googling, I found someone else had this same issue in Jan 2022 on the Rust forums, working out that the key issue here was ld: library not found for -lSystem. It also (wonderfully) included a suggested fix: to pass a new (random and otherwise unknowable) library search path into rustc when calling it:
➜ ~ rustc -L /Library/Developer/CommandLineTools/SDKs/MacOSX.sdk/usr/lib ./main.rsBut this is clunky, and not massively helpful if you have to do this every time. I don't want to have to setup a build script to inject it. I also had no idea where this came from directly, so it doesn't help with the 'why'.
The immediate fix for this is to add this directory to both your path and your library path, i.e. adding the following to my .zshrc (or your .bashrc or similar):
export PATH=$PATH:/Library/Developer/CommandLineTools/SDKs/MacOSX.sdk/usr/lib # Needed for Rust compilation and linking
export LIBRARY_PATH=$LIBRARY_PATH:/Library/Developer/CommandLineTools/SDKs/MacOSX.sdk/usr/lib # Needed for Rust compilation and linking
After discussing with a couple of friends (thanks Adam and Jamie), we worked out that Rust was looking for the System library, usually found at /usr/lib/libSystem.dylib — but such a file doesn't exist. This appears to be one of the more important Darwin / macOS libraries, so it was weird that we couldn't find or access it. Our conclusion was that my particular install of macOS (having gone through various OS upgrades over the years) has got its shared libraries mucked up somehow, in Apple's move to virtual libraries (moving shared libraries out of the file system and into some sort of virtual registry, aiui), similar to what's described here. Hence, the linker throwing a hissy fit for something that should have been trivial.
Funnily enough, checking which libraries a binary links to using otool gives the following output:
➜  ~ otool -L main
main:
    /usr/lib/libSystem.B.dylib (compatibility version 1.0.0, current version 1311.0.0)
    /usr/lib/libresolv.9.dylib (compatibility version 1.0.0, current version 1.0.0)
    /usr/lib/libiconv.2.dylib (compatibility version 7.0.0, current version 7.0.0)
...none of which exist in actual or symlink form in /usr/lib/, but the program runs just fine.
Still no idea how to fix more permanently, or to resolve the non-existence of /usr/lib/libSystem.dylib in a more sensible way.
Hope this saves someone else (or future Martin) from some pain!
Component-Based Formal Analysis of 5G-AKA: Channel Assumptions and Session Confusion
Our paper got accepted in NDSS 2019. Win! Read the full paper here.
Slides to follow.
Obligatory MathJax Example
When \(a \ne 0\), there are two solutions to \(ax^2 + bx + c = 0\) and they are $$x = {-b \pm \sqrt{b^2-4ac} \over 2a}.$$
Secure Authentication in the Grid: A Formal Analysis of DNP3: SAv5
Our paper got accepted in ESORICS 2017. Win! Read the full paper here.
Update 13/09/2017: We won best paper!!
HSTS, GitLab, and LetsEncrypt
I set up a test install of GitLab on one of our group's servers, and set up and successfully deployed LetsEncrypt with it. This is awesome! TLS certificates in seconds!
For various reasons, we only have one domain and IP for this overall server, that has multiple VMs on it. I then wanted to set up a monitoring tool, such as NetData.To run this on the same domain I had to set it up on a different port. (This is running in a separate VM to GitLab, but on the same HyperVisor, and hence same domain).
This was all well and good, until you try to visit both in the same browser. GitLab (when running over TLS) enables HSTS by default. This is the behaviour you want for GitLab, i.e. as soon as a client has visited httpS://mygitlabdomain.com, there should be no way of downgrading a connection to http://mygitlabdomain.com in future visits.
However, for our NetData install (running at e.g. http://mygitlabdomain.com:9999), this was a disaster: as soon as I tried to visit NetData again (from an install that I knew was working fine, and had previously visited), I was a) being redirected to httpS://mygitlabdomain.com:9999, and b) now only getting ERR_SSL_PROTOCOL_ERROR errors, with no further information. This only occurred after I enabled TLS on GitLab, but didn't notice the link between the two at the time.
Someone sensible suggested that HSTS might be the cause of this behaviour. You can have multiple TLS configurations on the same domain, different ports, but if HSTS is configured for the default ports (i.e. 80 automatically redirecting to 443) then it ties that configuration and requirement for TLS to all ports for that domain.
The immediate, temporary, client-side fix (for testing purposes) is therefore to remove the HSTS config for this domain in Chrome, by going to chrome://net-internals/#hsts and adding the domain in question to the 'delete domain' form. This only temporarily enables the non-port 443 server for use without TLS again.
The longer term fix in (for us at least) seems to be to run the HSTS demanding install (GitLab) on ports other than 80/443, so that the browser doesn't expect TLS for all servers at that domain (on a range of different ports). The better fix of course is to add TLS to all servers on all ports at the same domain!
TLS (SSL), WordPress, Apache VHosts, LetsEncrypt, and CloudFlare
It took a little while to get TLS/SSL working with this site as I use CloudFlare, and when I couldn't get it to work, I guessed it was because of CloudFlare, rather than WordPress. The main, persistent error I was getting whenever I enabled SSL in the Apache config was ERR_TOO_MANY_REDIRECTS. Turns out it was actually an error with the (WordPress) redirection all along.
Getting the LetsEncrypt certificate sorted wasn't too much hassle once I worked out that CloudFlare didn't play nicely with the \--apache flag. The \--webroot flag works perfectly though:
sudo letsencrypt certonly --webroot --webroot-path /path/to/website/folder --renew-by-default --email [email protected] --text --agree-tos -d braindetour.com -d www.braindetour.com -d direct.braindetour.com
When I tried to use the \--apache flag, it worked on the \--dry-run but not the actual run.
The certificates get placed in /etc/letsencrypt/live/braindetour.com/
Add the following lines to your Apache .conf file (for me this is in /etc/apache2/sites-available/):
SSLEngine on
SSLCertificateFile /etc/letsencrypt/live/braindetour.com/cert.pem
SSLCertificateKeyFile /etc/letsencrypt/live/braindetour.com/privkey.pem
SSLCertificateChainFile /etc/letsencrypt/live/braindetour.com/chain.pem
and change <VirtualHost *:80> (at the top) to <VirtualHost *:443>.
At this point I had followed various instructions and here, apart from changing the site URL (in the WP Admin console) to https:// from http://, the instructions stopped. This would have been fine, had I not still been getting ERR_TOO_MANY_REDIRECTS in Chrome every time I tried to access the site, over either HTTP or HTTPS.
Various Apache mod_rewrite rules were suggested, including e.g.:
RewriteCond %{HTTPS} !=on RewriteRule ^ https://www.%{HTTP_HOST}%{REQUEST_URI} [L,R=301]
but this didn't have the desired effect.
What worked in the end was adding another VirtualHost within the apache .conf file as follows:
<VirtualHost *:80>
ServerName www.braindetour.com
ServerAlias braindetour.com *.braindetour.com
Redirect / https://www.braindetour.com/
</VirtualHost>
This then sorts the redirection properly, and as you can now see, visiting http://www.braindetour.com instantly redirects to the https version.
All kudos to CloudFlare and LetsEncrypt for such excellent products.
DacMagic 100 USB mode on Mac OS X: 96kHz vs 192kHz
Just bought a brand new Cambridge Audio DacMagic 100, and I'm really pleased with it.
The only slight foible with it was that, out of the box on Mac OS X, it defaults to USB 1.0, rather than USB 2.0. This means that the maximum sample rate supported by default is 96kHz, rather than the advertised maximum of 192kHz.
The simple way to fix it (as found in the depths of the online PDF manual) is found on page 14:
Switching between USB Class 1 and USB Class 2 operation
Your DacMagic 100 will come set to driverless USB Audio Class 1.0 by default, but it can be configured to run in either USB Class Audio 1.0 or 2.0 mode. To change USB Class, press & hold the Source button while bringing the unit out of standby. One of the digital input source LEDs will illuminate to indicate the current USB setting: Digital 1 represents USB Audio Class 1.0, likewise Digital 2 is USB Audio Class 2.0.
Simple fix, but not otherwise too well-documented on the internet. The DacMagic 100 should now have the 192kHz light illuminated, and it should show up as using USB 2 in System Information, and Audio MIDI Setup; set the DacMagic as the default output device and you're sorted. I can't think why they thought it was a good idea to default to the lower quality, unless there were compatibility issues: I think all computers sold within the last 15 years have USB 2.0 or higher.
XenServer, VMs, pfSense vs. IPFire, and Heavy Lifting
My research group ordered a nice new shiny server with some grant money, for crunching through models of security protocols with our model checker. We requested a server that would be suitable for lots of heaving lifting with many cores and lots of memory, and eventually ordered a nice shiny Dell Poweredge R630 with 48 cores, and 512GB of memory.
The initial plan was to run a hypervisor on the server, and to have one big VM using ~75% of the server's resources, and then a couple of smaller VMs on the side for other purposes, e.g. a file-server, monitoring, and the like. We were strongly recommended to install ESXi for this purpose, and did so, but sadly found out after installing it that on the free licence version of ESXi, each VM can have a maximum of 8 vCores: not so useful. A licence to do what we wanted was only about £400, but the grant money had already been spent, so that wasn't going to happen.
Enter XenServer. This seems to be pretty well respected as a hypervisor, and unlikely to have any artificial software restrictions as it's open source. In spite of taking guidance from various online walkthroughs, installing it from USB stick failed to work with our server, so we went for the old-school bootable DVD, which worked perfectly.
Installation was pretty painless once I eventually found a DVD burner and some blank DVDs; the only downside to XenServer seems to be the lack of a Linux/Mac client for the hypervisor. That said, it was easy enough to spin up a local Windows VM on my Mac to access XenCenter, through which you can configure new VMs and all the routing configurations. Adding ISOs to the XenServer install wasn't as straight forward as I feel it ought to have been (and indeed not possible through XenCenter's GUI), but perfectly possible in the end. This guide by Simon Barnes was very helpful in that respect. (Mirrored here)
TL;DR: SSH into XenServer. Create a folder called ISO_Storage in
/var/run/sr-mount/<id-of-main-hypervisor's-storage>/andwgetany desired ISOs into this folder. Add this folder as an ISO Library to your hypervisor's management tool. Magic incantations to be found in the above blog post. Note that just 'wget'ting the iso into another location will be restricted to 4GB total space, so you need to choose the right location in the file-system. Click 'Rescan' in XenCenter after downloading a new ISO.
Now we can fire up Virtual Machines, installing their OS from a local ISO image. I configured one VM to be our main heavy lifting VM (so we can hit things with a Tamarin Hammer™), but found that in the Windows XenCenter software, the maximum number of cores per VM is 16. This is easily rectified: do the normal wizard-like configuration in XenCenter, and then once it's configured (but before installing an OS) you can change the number of cores through the Linux interface either in the main hypervisor's console, or over SSH, as described in the following useful guide by Jan Sipke van der Veen.
TL;DR: Create a VM with the wizard, and, e.g. 16 cores. Make sure the VM is halted. Run
xe vm-listto find your VM's <uuid>. Then:
xe vm-param-set VCPUs-max=32 uuid=[replace_with_uuid]
xe vm-param-set VCPUs-at-startup=32 uuid=[replace_with_uuid]
Start the VM and you're good to go.
There's a useful XenServer cheatsheet to be found here as well.
Now came the fun bit: networking. It was suggested that we set up one VM as a firewall and router (with a public IP connected to NIC1), and to create a separate private network for the VMs, at least partially separated from the internet; we then use NAT to bridge that gap externally, but only on specific ports. We have a separate IP address for accessing the management console, connected to NIC0. This, in my mind, seems to be very a sensible configuration.

The recommendation we were given was to use pfSense, as this is a well known and respected firewall operating system. Unfortunately, for some unknown reason, pfSense and XenServer don't currently seem to play nicely together, or at least they certainly didn't in our case. We configured the network as follows:
- Hypervisor level: configure XenServer such that pfSense was connected to both NIC1 and 'Private Network', and the VMs underneath only connected to 'Private Network'
- Firewall/pfSense level: WAN connected to NIC1, LAN connected to 'Private Network', and DNS, DHCP, and external IP address set up correctly.
We then had some very odd behaviour:
- Pinging external IP addresses and e.g.
google.comworked perfectly from the pfSense box, as didcurl -v google.com. - Pinging external IP addresses (e.g.
8.8.8.8) from any of the VMs worked absolutely fine (sub 5ms), but pinginggoogle.comfailed completely (timed out) if you set the VM's DNS servers to external (e.g. our department DNS servers, or8.8.8.8, 8.8.4.4), but worked fine if you set the VM's DNS server to the pfSense box, in this case192.168.1.254. I verified that nothing was actively blocking DNS traffic on port 53. - Attempting to browse to (or
curl)google.comfrom within a VM failed whether you went direct to the URL, or to the IP address returned by the name-servers. - Setting up a proxy on the pfSense box (shudder) and then configuring the VM's web-browsers to use this proxy worked fine, but was such an ugly, crazy hack that I vetoed it, as this cured the symptoms, not the underlying problem.
- Looking at
traceroute/tracepath, ping,andnslookupled us to conclude that in spite of the correct connections existing, the packets were timing out somewhere between the VMs and their eventual destination, perhaps caused by pfSense (in spite of being under minimal load). - Some comments from other users with the same problems suggested it might have been to do with inefficient calculation of checksums within pfSense, but I never found conclusive evidence for or against this before giving up on this route.
None of the suggested fixes in the above links worked, so my only personal opinion and recommendation as a result of this experience is: due to the poor performance I and others seem to have experienced, do not use pfSense with XenServer. This is a real shame, as I otherwise really liked pfSense's setup, interfaces, and user-friendliness.
Looking into various other alternatives to pfSense produced a range of options, but in the end I settled on IPFire as a possibility, and due to its ease of installation and successful configuration, stuck with it. (Sadly I've just noticed they don't have a valid TLS/SSL certificate for their site. Logged as a bug.)
Installing and configuring IPFire was a dream, simply set the WAN side as RED, the LAN side as GREEN and then turn on DHCP; this was sufficient to give the VMs internet access. Enabling port-forwarding using NAT (in our case to SSH into any of the VMs from outside the server, e.g. port 5555 external -> 22 internal to a specific LAN IP) was exceptionally easy. Once these rules were configured and working, it was then just a matter of adding a rule blocking all other incoming traffic through the firewall.
Having been given a second IP address for the VMs' private network via the firewall (rather than for hypervisor management), I mistakenly 'added' this IP address to the hypervisor in XenCenter: doing this is not only not required, but it means that hypervisor itself claims that IP, meaning you log in to the hypervisor's management console over SSH, rather than being pointed towards the firewall VM. Leaving the hypervisor unaware of this IP, but telling the (IPFire) firewall VM that it was responsible for it worked perfectly.
With all the routing and firewall configuration complete, the next step was to set up some basic security precautions on the VMs: Bryan Kennedy's post on "My First 5 Minutes On A Server; Or, Essential Security for Linux Servers" is an excellent starting point.
TL;DR: Install
fail2ban. Put your public key into~/.ssh/authorized_keys. Lock down SSH logins to public-key only in/etc/ssh/sshd_config. Enable automatic security updates. Install and configurelogwatch.
Once this was all done, the VMs were ready for use by our group, so I set up personal user accounts, and let them loose. One shiny VM (of many) with 32 cores and 378GB of memory ready and waiting for that Tamarin Hammer!
Update 04/10/2016: Accessing the IPFire control panel is only possible from the GREEN side of the firewall. This is not possible from a normal computer, even within e.g. the university network, as the only machines inside the firewall are VMs on the main server. There are two ways to get around this: either set up a new VM (of e.g. Ubuntu Desktop) in XenCenter, enter the console tab and fire up a browser. Access the firewall's internal IP address on port 444, and login with the credentials you set up. The alternative method is just to log in to a VM on the main server over SSH, but enable X11 forwarding, and then open chromium-browser or similar.
ssh -X username@hostVMAddress
chromium-browser
(Access e.g. 192.168.0.1:444 in X11 GUI browser)
This will then open an X11 window locally running a browser window from the server, and you will be able to login to the firewall on the GREEN side, assuming the VM is configured on the GREEN side of the firewall. You will probably have to use one of these two routes to configure the IPFire firewall in the first place.
Firewall Networks and Groups used together is a useful way to add multiple IP ranges to a specific firewall rule.
Email me ([email protected]) if you have any specific questions or queries about this setup. Also noticed that XenServer's website doesn't have a valid TLS certificate. Reported.
Login attempts to my servers
I've got a couple of years worth of logs from this server and others, showing the good the bad and the ugly. Most interesting is it keeps every IP address that has ever tried to connect to each server in the last 24 hours, and emails me a list of these, among other things.
I downloaded my email inbox from GMail and wrote a quick bit of Python to scrape through a .mbox file for IP addresses that had attempted to login. In decreasing order of number of unique IP address which attempted to connect to one of my servers over SSH, the countries are as follows: US (12,048), China (4,614), GB (2,761), India (1,816), Bahrain (1,507), Brazil (1,123), Canada (1,093).
Note that this is just the country of origin of the IP, it doesn't mean the server was actually controlled by someone in that country -- botnets, people!
Here are those IP addresses plotted on a graph, where the x-axis is the first octet of the address, and the y-axis is the second octet of the address, e.g. x.y._._
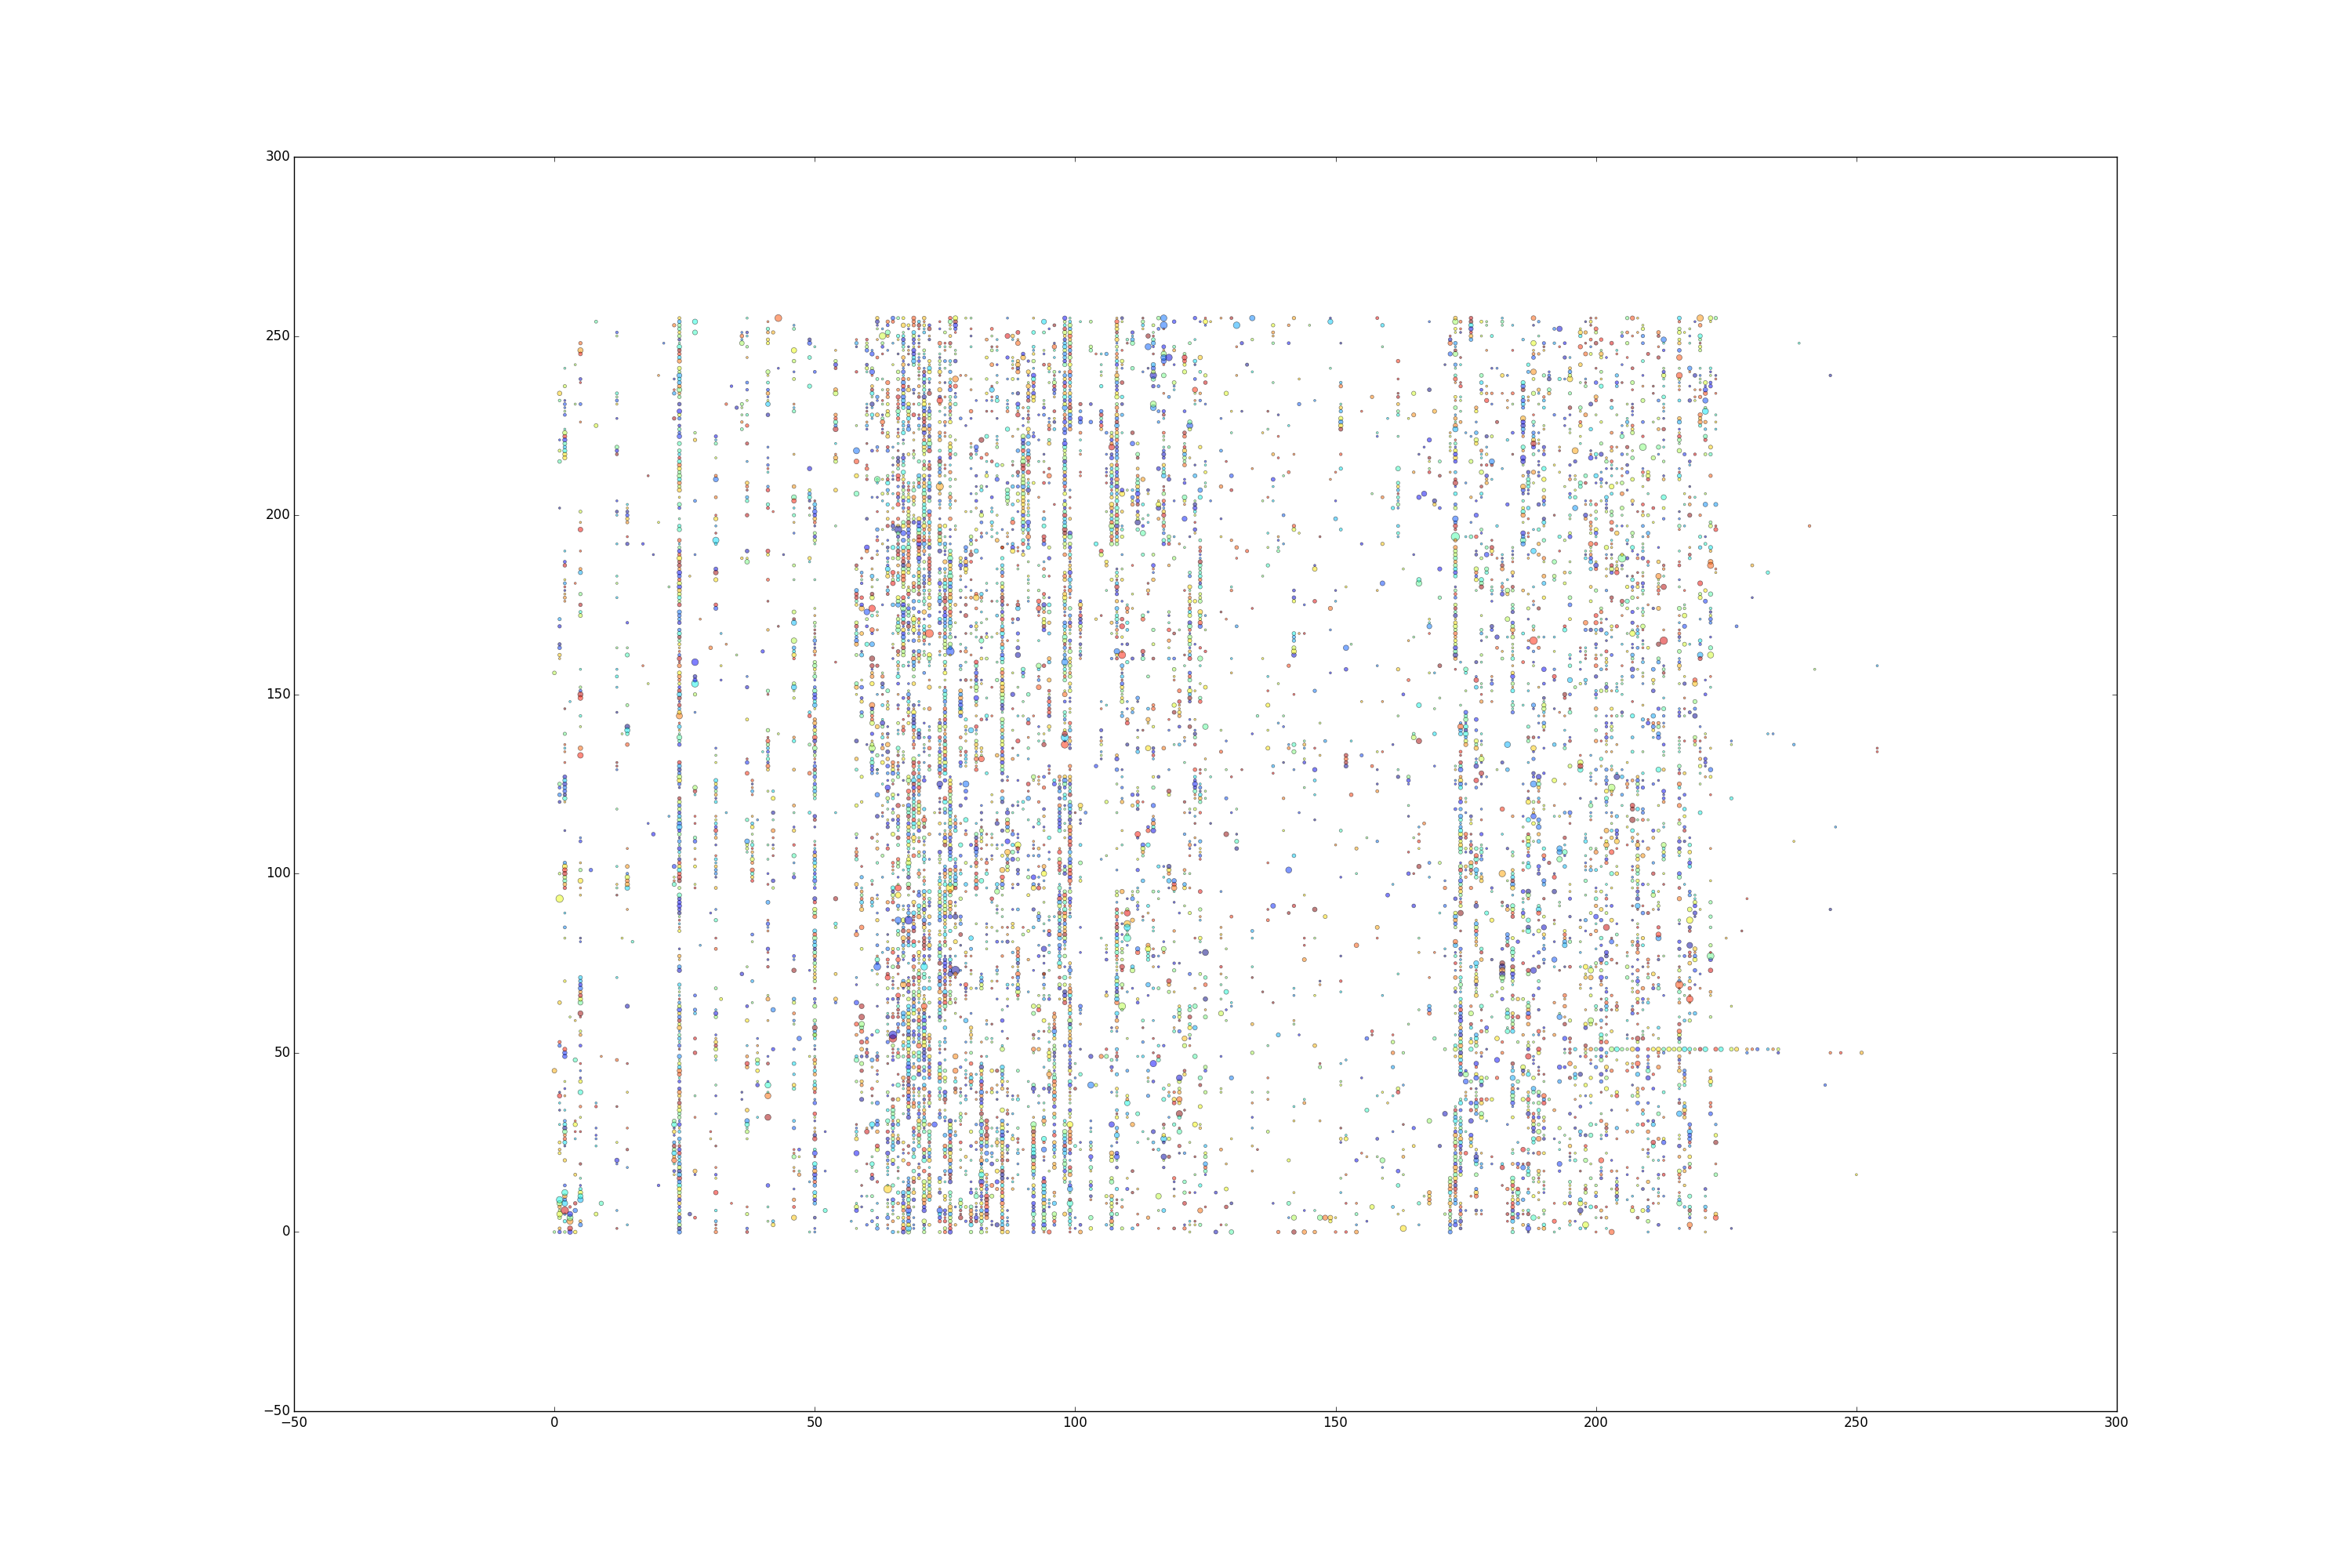 (Click for larger)
The vertical banding is what I'd expect, but I'm fascinated by the horizontal banding at ~52 on the y-axis.
I'll publish the code at some point, but at the moment the associated data files have all the full IP addresses, so I don't want to make them public yet.
My research, described using only the ten-hundred most common English words:
Computers were made to work, and not be safe against people who want to break into them. Bad people started to find they could make money and have fun by breaking into computers, so good people had to start thinking about how to stop bad people breaking into them.
By this point, a lot of very important computers were out there, with nothing to stop people breaking into them. So we are trying to fix that. Turns out, it's easier to make stuff that stops people breaking into them when you think about it from the start, rather than trying to do it after the computer's been made.
At the moment, if a bad person breaks into one small bit of your computer, a lot of the time, they can do anything they want in the rest of your computer. This is bad. What I'm trying to do is make parts of computers (and the way these parts talk to each other) that don't completely break when just one bit gets broken into.
Made with The Up-Goer Five Text Editor.